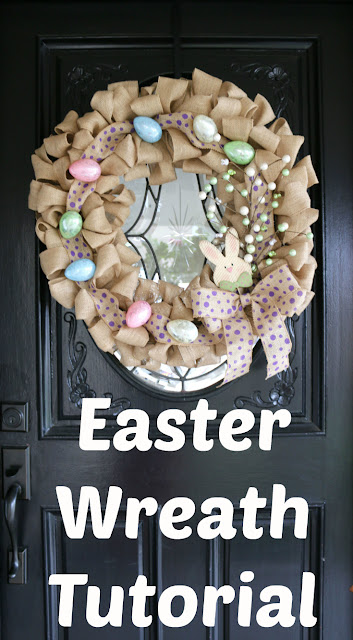
DIY: Burlap Easter Wreath
March 07, 2016, by Deena @Shoes to ShirazHappy Monday! Us ladies over here at The Blended Blog are feeling a bit of the Spring Fever, so we thought every Monday each of us are going to show you what we've been doing to get ready for Spring. Whether it be a craft, recipe, or décor, all having to do with Spring! Fun right? So I'm kicking it off today with an Easter Wreath Tutorial! What better way to celebrate Spring than with Easter.
Last week on my blog (Foxy's Domestic Side), I showed you how to make a burlap wreath. This week I'm going to show you what to do with that wreath. So you're done with the wreath, now what? I already showed you my St. Patrick's Day Wreath, so I figured I would show you my Easter Wreath. Sort of sad that Easter is only 2 weeks after St. Patty's but I'll enjoy it while I can!
Here's what you'll need:
Burlap Wreath
Ribbon (I picked purple polka dots)
Some Sprigs of something, I chose some green and white berries
A cute Sign (I chose a bunny)
Some Easter Eggs (cause why not, and they were cute)
If you were starting from scratch this is what it would look like:
This is what I started with:
Step 1:
Decided how big you want your bow. As you can see below, I tried one and though it was way too big, then I tried the other one and decided that was the perfect size.
Step 2:
Now that you've decided on the bow size, make it! I showed a video how to make it here. But here are the steps, once you layer the ribbon over each other like this, I like to fan fold the center of the bow, and then use floral wire to keep it together.
For my St. Patty's wreath since it was already a green theme, I left it there, but this time I wanted to cover it up. I cut some of the ribbon, and then tri-folded it and glued it to the bow.
Step 3:
Then with the left over ribbon I used it to create my first layer on my wreath. If you want to know how I did that, here's a video I made showing you that.
Step 4:
I always try to make my wreaths reusable. So with the eggs, I decided to use some bamboo skewers and attach them to the eggs, so that I could just stick them in the wreath and then remove them when I wanted.
I did cut the bamboo skewers shorter. In hind sight I should have made them slightly shorter. I would recommend about 3-4" in length.
I cut an "X" into each egg, an then used a hot glue gun to stick the bamboo skewers in place.
I placed the eggs around the wreath as a starting point (I did end up moving a couple of them later). I stuck the sharp end through the burlap, it's the perfect size to squeeze the bamboo skewers through and have them stay. I don't think toothpicks would work, only because they aren't long enough or thick enough.
Once you place the egg, it's a good idea to fluff the burlap around it, to try and hide as much stick as possible.
Step 6:
I put the two sprigs of berries together and bent the stems so it followed the shape of the wreath. I did not want to cut them, so I bend them and strung through the burlap, I didn't have to glue anything down the burlap seemed to keep it in place. I then added the bow to cover up the bit of showing berry stems.
How I attached the bow, I threaded some floral wire through the back side of the bow and then tide it down to the wreath. For some reason I don't have a picture of that. Darn.
Step 7:
I added the cute bunny, just behind the bow and in front of the berries. I stuck it in there, and then ended up hot gluing one berry to the back side of it, knowing it would be easy to remove that when I wanted to disassemble it. Then I added some wire to the back side and threaded it through the burlap to keep it a little more flat (I did this same thing for the bow in Step 6).
And that's it! You're all done! See 7 easy steps to complete an Easter Wreath! When I went to Hobby Lobby, I just looked at what was on sale and bought that, and figured the rest out later. If I had a plan I probably would have added the berries all the way around to create another layer... So here's the finished product!
And how it looks on my front door.
Let's break down the cost:
Wreath, was about - $30
Purple Polka Dot Ribbon (15 ft) - $3.49 (on sale, originally $6.99)
Berries Sprigs - $2.39 each (on sale, originally $3.99)
Easter Bunny - $1.79 (on sale, originally $2.99)
Easter Eggs - $3.59 (on sale, originally $5.99)
Total for wreath: $43.65 (not including sales tax)
What do you think? Something you could do? I hope so, don't be intimidated and just have fun with it!
Linking up with: That DIY Party // Mad In Crafts for Mad Skill Tutorial Party //Lou Lou Girls for Fabulous Party// Ladybug Blessings for Handmade Tuesdays // Cozy Little House for Tweek It Tuesday // My Girlish Whim for Your Whims Wednesday // Sew Crafty Angel for Waking Up Wednesday //I Gotta Create for Wildly Original // AKA Design for Weekend Retreat
Sarah is a regular contributor of The Blended Blog. She is an engineer and Mom of 2 just trying to bring out her creative side through her blog, Foxy's Domestic Side.


0 comments